解析Code属性
解析Code属性
字节码指令存储在方法结构的属性表的Code属性中。这一节我们将通过完成对Code属性的二次解析了解Code属性,了解字节码指令是怎么存储的在Code属性中的。
Code属性是种可变长的属性,属性中包含了方法指向的字节码指令及相关辅助信息。实例初始化方法<init>、类或接口的初始化方法<clinit>都会有Code属性,但不是每个方法都有Code属性,如声明为native的方法、abstract抽象方法、接口中的非default方法就没有Code属性。
方法结构的属性表中最多只能有一个Code属性,Code属性的结构如表2-60所示。
表2-60 Code属性的结构
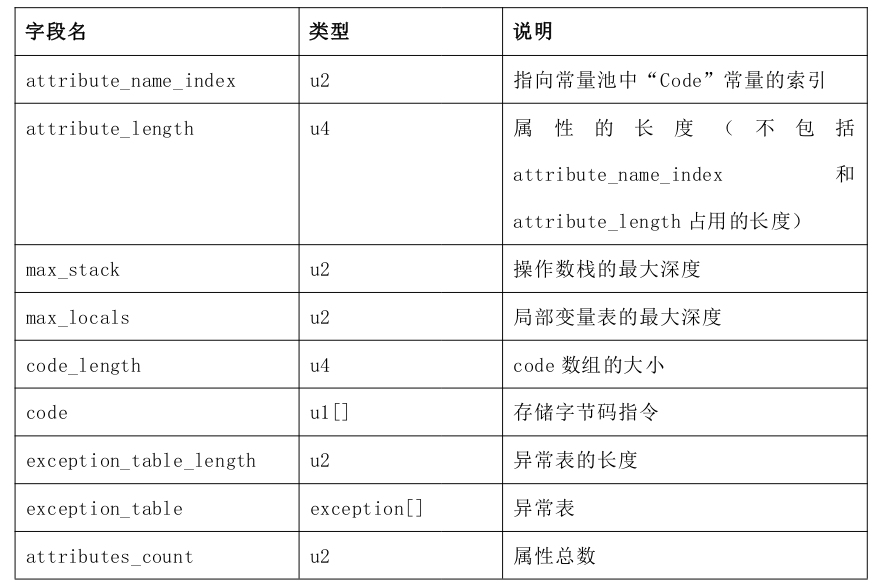

max_stack与max_locals分别对应操作数栈的大小和局部变量表的大小。code项用一个字节数组存储该方法的所有字节码指令。属性也可以有属性表,attributes项便是Code属性的属性表。在Code属性中,属性表可能存在的属性如LineNumerTable属性、LocalVariableTable属性。
LineNumerTable属性:被用来映射源码文件中给定的代码行号对应code[]字节码指令中的哪一部分,在调试时用到,在方法抛出异常打印异常栈信息也会用到。
LocalVariableTable属性:用来描述code[]中的某个范围内,局部变量表中某个位置存储的变量的名称是什么,用于与源码文件中局部变量名做映射。该属性不一定会编译到class文件中,如果没有该属性,那么查看反编译后的java代码将会使用诸如arg0、arg1、arg2之类的名称代替局部变量的名称。
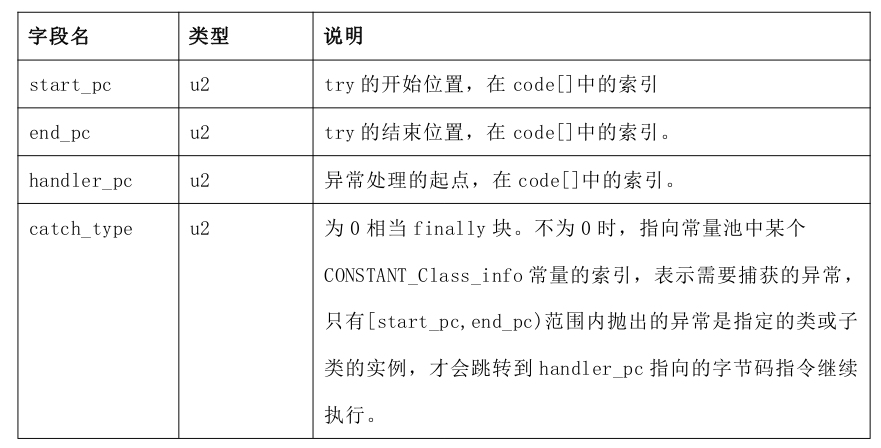
Code属性的exception_table项是存储方法中的try-catch信息的异常表,异常表的每一项都是固定的结构体,异常结构如表2-61所示。
表2-61 异常结构
根据表2-60和表2-61定义Code属性对应的Java类,如代码清单2-62所示。
代码清单2-62 Code_attribute类
public class Code_attribute {

    private U2 attribute_name_index;
    private U4 attribute_length;
    private U2 max_stack;
    private U2 max_locals;
    private U4 code_length;
    private byte[] code;
private U4 exception_table_length;
  private Exception[] exception_table;
    private U2 attributes_count;
    private AttributeInfo[] attributes;
  // 异常表中每项的结构
    public static class Exception {
        private U2 start_pc;
        private U2 end_pc;
        private U2 handler_pc;
        private U2 catch_type;
    }

}
对Code属性进行二次解析主要是想拿到字节码信息,属性表和异常表我们就不解析了,异常表在本书第三章再详细介绍。对Code属性二次解析如代码清单2-63所示。
代码清单2-63 Code属性二次解析
public class AttributeProcessingFactory{
public static Code_attribute processingCode(AttributeInfo attributeInfo) {
          Code_attribute code = new Code_attribute();
          ByteBuffer body = ByteBuffer.wrap(attributeInfo.getInfo());
          // 操作数栈大小
          code.setMax_stack(new U2(body.get(),body.get()));
          // 局部变量表大小
          code.setMax_locals(new U2(body.get(),body.get()));
          // 字节码数组长度
          code.setCode_length(new U4(body.get(),body.get(),body.get(),body.get()));
          // 解析获取字节码
          byte[] byteCode = new byte[code.getCode_length().toInt()];
          body.get(byteCode,0,byteCode.length);
          code.setCode(byteCode);
          return code;
     }
}
现在编写单元测试,使用我们编写好的Class文件结构解析项目,先将class文件解析为一个ClassFile对象,然后再遍历该ClassFile中的方法表,获取每个方法中的Code属性,再对Code属性进行二次解析。单元测试如代码清单2-64所示。
代码清单2-64 CodeAttributeTest类
public class CodeAttributeTest {

    @Test
    public void testCodeAttribute() throws Exception {
        ByteBuffer codeBuf = ClassFileAnalysisMain.readFile("RecursionAlgorithmMain.class");
        ClassFile classFile = ClassFileAnalysiser.analysis(codeBuf);
        // 获取方法表
        MethodInfo[] methodInfos = classFile.getMethods();
    // 遍历方法表
        for (MethodInfo methodInfo : methodInfos) {
            // 获取方法的属性表
            AttributeInfo[] attributeInfos = methodInfo.getAttributes();
            if (attributeInfos == null || attributeInfos.length == 0) {
                continue;
            }
            System.out.println("方法:" + classFile.getConstant_pool()
                                [methodInfo.getName_index().toInt() - 1]);
            // 遍历属性表
for (AttributeInfo attributeInfo : attributeInfos) {
                // 获取属性的名称
                U2 name_index = attributeInfo.getAttribute_name_index();
                CONSTANT_Utf8_info name_info = (CONSTANT_Utf8_info)
                        classFile.getConstant_pool()[name_index.toInt() - 1];
               String name = new String(name_info.getBytes());
       // 对Code属性二次解析
                if (name.equalsIgnoreCase("Code")) {
                    // 属性二次解析
                    Code_attribute code = AttributeProcessingFactory.processingCode(attributeInfo);
                    System.out.println("操作数栈大小:" + code.getMax_stack().toInt());
                    System.out.println("局部变量表大小:" + code.getMax_locals().toInt());
                    System.out.println("字节码数组长度:" + code.getCode_length().toInt());
                    System.out.println("字节码:");
                    for (byte b : code.getCode()) {
                        System.out.print((b & 0xff) + " ");
                    }
                    System.out.println("\n");
                }
            }
        }
    }

}
例子中使用到的RecursionAlgorithmMain类如代码清单2-65所示。
代码清单2-65 RecursionAlgorithmMain类
public class RecursionAlgorithmMain {

    private static volatile int value = 0;

    static int sigma(int n) {
        value = n;
         System.out.println("current 'n' value is " + n);
        return n + sigma(n + 1);
    }

    public static void main(String[] args) throws IOException {
        new Thread(() -> sigma(1)).start();
        System.in.read();
        System.out.println(value);
    }

}
以RecursionAlgorithmMain的sigma方法为例,首先使用javap查看sigma方法的字节码,目的是对比我们编写的解析工具解析的结果,验证解析结果是否正确。
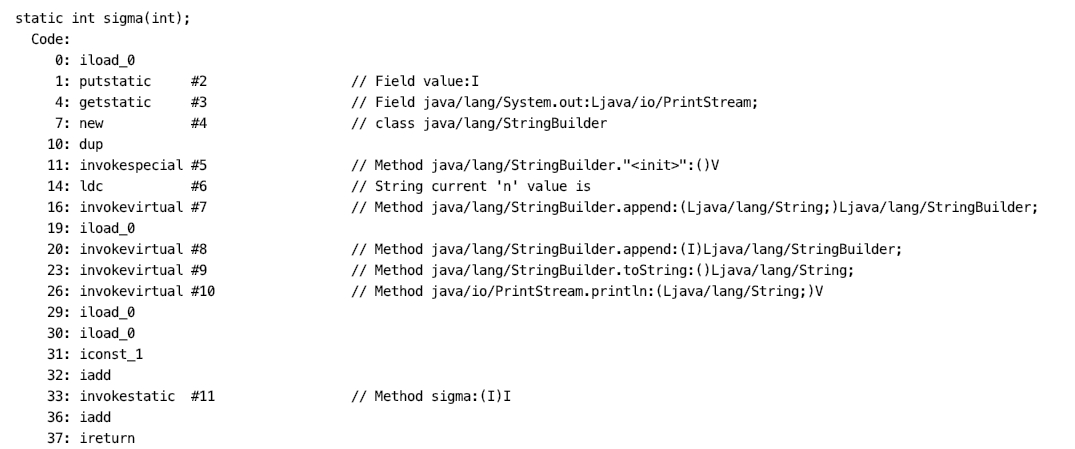
图2.12 反编译sigma方法
使用编写好的解析工具解析sigma方法的Code属性,结果输出如图2.13所示。

图2.13 Code属性解析结果
这里我们还需要将字节码转为十六进制输出,方便与字节码指令表对照。编写将byte[]转十六进制字符串的工具类,并将代码清单2-65的字节码打印输出部分替换为使用该工具类转为十六进制字符串再打印输出。
byte[]转十六进制字符串工具类的实现,如代码清单2-66所示。
代码清单2-66 HexStringUtils类
public class HexStringUtils {

    public static String toHexString(byte[] codes) {
        StringBuilder codeStrBuild = new StringBuilder();
        int i=0;
        for (byte code : codes) {
      // toHexString将字节转十六进制,实现略...
            codeStrBuild.append(toHexString(code)).append(" ");
            if(++i==9){
                i=0;
                codeStrBuild.append("\n");
            }
        }
        return codeStrBuild.toString();
}

}
将字节码转为十六进制字符串输出,结果如图2.14所示。
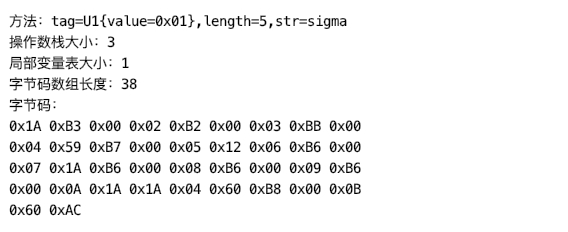
图2.14 Code属性解析结果十六进制显示
图2.14中,字节码部分的0x1A对应iload_0指令,0xB3对应putstatic指令,由于putstatic指令需要一个操作数,因此0xB3后面的0x00 02就是指令所需的操作数。这个操作数的值为常量池中某个CONSTANT_Fieldref_info常量的索引,U2类型,占两个字节。此处putstatic指定的操作数为2,即使用常量池中索引为2的常量。由此可验证Code属性二次解析成功,而关于字节码指令的介绍将在下一章详细介绍。