Check on Low Fuel Level Switch of Feed Tank and Ca...
1.Equipment Needed
A fuel drain pipe,a fuel tank with a fuel gauge with an accuracy within 0.5%,a graduated container(25L)and a fuel container(600L).
2.Preparations
·Lift up and level the helicopter.
·Open right front checking cap(to facilitate operation on the adjusting screw of fuel gauge amplifier)and open MGB and engine cowlings.
·Supply 28V DC power to helicopter.
·Place the fuel container and reduce the fuel in fuel tank groups to 48kg(about 60L).
·Replace the fuel-in pipe on the fire-proof baffle plate with a fuel drain pipe.
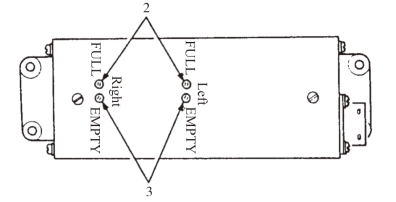
3.Testing Procedures(see the figure below)
Note:Low fuel level warning indicator may light up before the booster pumps are switched on but it has to go out after booster pumps enter into work.
·Drain the remaining 60 liters of fuel with heliborne pumps until low fuel level warning indicator lights up.
·Put a terminal of the fuel drain pipe into the graduated container and drain the fuel until the pumps begin no-load operation(dry run).Make sure there is more than 20 liters of fuel in the container.
·Rotate the corresponding adjusting screw on the fuel gauge amplifier to set the display of fuel gauge to 0kg.
·Add 400kg(about 506L)of fuel into the fuel tank groups.
·Rotate the corresponding adjusting screw(2)on the fuel gauge amplifier to set the display of fuel gauge to 400kg.
Note:The display of fuel gauge is supposed to be stable within 2 minutes after each adjustment on the adjusting screw.
·Remove the fuel drain pipes.
4.Finishing Touches
·Lower the helicopter down onto the ground.
·Connect and fasten the fuel-in pipe and remove the fuel container.
·Unplug GPU.
·Re-install MGB and engine cowlings and close the right front checking cap.

Fuel Gauge Amplifier
